Key takeaways
- The one rule this chandelier buying guide leads with: size a fixture from the surface below it, not the room. Over a dining table the accepted design rule is a diameter one-half to two-thirds the table width. For a room-centered fixture, add the room length and width in feet and read the total as inches, which is guidance published by the American Lighting Association.
- Hang the bottom 30 to 36 inches above a dining table on an 8 ft ceiling, adding roughly 3 inches per additional foot of ceiling height. In any walkway, foyer or stairwell, keep at least 7 ft of floor clearance.
- Check the ceiling box before you buy. NEC 314.27(A)(2) requires a ceiling outlet box to support a luminaire of at least 50 lb, and anything heavier must be supported independently of the box unless the box is listed for that weight.
- Three measurements matter, not one: diameter, body height, and total drop from ceiling to lowest point. Guides that give you diameter alone are why chandeliers arrive at the wrong height.
- Mounting method is a decision in its own right. Stem or downrod mounts hold a fixed height and suit high ceilings, chain mounts adjust easily, cord-hung fixtures adapt to slopes, and flush mounts solve ceilings under 8 ft.
-
Montclair Light Works chandeliers are handcrafted in the USA from metal and spun components, in 3-light, multi-light and linear configurations, with 23 standard powder-coat finishes.
Chandelier Buying Guide Basics: What Makes One Worth Specifying
A chandelier is a ceiling-mounted fixture with multiple light sources or arms, which is what lets it spread light across a space rather than pooling it under a single point. That definition matters commercially, because it separates a chandelier from a large pendant regardless of how either is marketed.
Four things decide whether a chandelier is worth its price, and none is the shape. Construction: what the body and shade are made from, and how thick. Finish system: whether the coating went over prepared metal or bare stock. Safety listing: whether it carries a UL or cUL mark with a stated location rating. Serviceability: whether a matching part will exist when you need one.
Silhouette gets the attention because it is the only variable a photograph conveys. The mistake we see most often is choosing the look first and discovering the drop, weight or finish limits afterward — usually after the electrician has arrived.
This chandelier buying guide works through those variables in the order a real purchase requires: size it, place it, choose how it mounts, confirm the ceiling can carry it, then settle materials, color, room fit and light quality. Sizing comes first because everything downstream depends on it.
One framing worth adopting early: a chandelier is architecture you live under, not an object you look at. It sits in your sightline at dinner and defines the ceiling plane of an entry, which is why the tolerance for getting it wrong is lower than for almost any other fitting in the house. Montclair Light Works chandeliers are handcrafted in the USA from metal and spun components, which is the starting point for most of what follows.
Chandelier Sizing Guide: The Three Measurements That Decide Everything
Size a chandelier using three separate numbers — diameter, body height and total drop — because getting one right and the others wrong is the most common expensive mistake in the category. Diameter is the widest horizontal span. Body height is the fixture itself, excluding chain, rod and canopy. Total drop is ceiling to lowest point.
Over a dining table, the table sets the diameter. Accepted design practice puts it at one-half to two-thirds of the table width, leaving clearance to the edge on both sides — roughly 24 to 32 inches over a 48-inch table.
For a fixture centered in a room rather than over furniture, such as a foyer, a living room or a bedroom, add the room length and width in feet and read the total as inches. A 12 by 14 ft room points to about a 26-inch diameter. That formula appears in residential lighting guidance from the American Lighting Association, the trade body for the residential lighting industry in the United States and Canada.
When the two rules disagree, trust the table. The fixture's job is to belong to the surface underneath it, and an open-plan room will otherwise push you toward something that dwarfs the furniture.
|
Surface or space
|
Suggested diameter
|
Notes
|
|
36 in. round table
|
18–24 in.
|
A compact 3-light configuration usually reads better than one wide fixture
|
|
48 in. round or square table
|
24–32 in.
|
The most forgiving size band in the category
|
|
60 in. table
|
30–40 in.
|
Check body height too — a tall fixture at this diameter can feel top-heavy
|
|
72 in. rectangular table
|
Linear, 24–36 in. long
|
A linear or multi-light fixture beats a round one over a long rectangle
|
|
96 in. rectangular table
|
Two matched fixtures, 24–30 in. each
|
Two identical fixtures distribute light better than one oversized piece
|
|
12 × 14 ft room, centered
|
About 26 in.
|
Room length plus width in feet, read as inches
|
|
Two-story foyer
|
Scale to the void, not the floor plan
|
Vertical proportion matters more than diameter here
|
Table 1 — Diameter starting points from accepted design practice, not a size list for any one brand. Table width drives the dining figures; room dimensions drive the rest. Cross-check both, take the smaller number, then confirm it against the spec sheet for the fixture you want.
Visual weight is the variable no formula captures. An open frame at 36 inches occupies far less of a room than a dense fixture at the same diameter, so a spun-shade design can usually go a size up. A linear multi-light configuration is the safest answer over any rectangular surface.
How High to Hang a Chandelier: Dining Tables, Foyers and Stairwells
Hang the bottom of a dining chandelier 30 to 36 inches above the table surface on a standard 8 ft ceiling, and add roughly 3 inches for each additional foot of ceiling height. On a 10 ft ceiling that puts the fixture around 36 to 42 inches above the table.
The range protects sightlines. Too high and the fixture lights the room instead of the table; too low and it blocks the face opposite you. Montclair Light Works publishes the same 30 to 36 inch guidance for hanging heights above a work surface in its product FAQ.
Anywhere people walk underneath, the rule changes to floor clearance: keep at least 7 ft from the floor to the lowest point of the fixture. That governs foyers, hallways, stairwells and any fixture not hung over furniture.
In a two-story foyer, center the fixture in the window if there is one, so it reads correctly from outside as well as from both floors. Scale to the vertical void rather than the floor area — undersized fixtures look lost from every angle.
Work the drop out on paper before ordering rather than after. Ceiling height in inches, minus table height, minus your chosen clearance, minus the fixture body height, gives the chain or rod length you need. A 10 ft ceiling with a 30-inch table, 36 inches of clearance and a 25-inch fixture body leaves 29 inches of rod. Confirm the fixture's maximum drop covers it, and on a sloped or vaulted ceiling ask the manufacturer what mounting hardware that specific fixture supports before committing. Measure at the exact mounting point rather than the tallest part of the ceiling.
Mounting Methods Compared: Stem, Chain, Cord and Flush
Mounting method is a separate decision from fixture choice, and it determines how much control you have over final height. Four methods cover almost every residential chandelier: rigid stem or downrod, chain, cord, and flush.
A stem or downrod mount holds the fixture at a fixed height on a rigid tube. It is the steadiest option, it keeps a fixture hanging plumb, and it suits high ceilings where a long drop needs to stay still. The trade-off is that height is set at order, so the drop calculation has to be right the first time.
Chain mounts buy flexibility. Links can be removed on site, which makes them forgiving on ceilings that turn out not to be the height the plans claimed. Cord-hung fixtures are the most adaptable of all: Montclair Light Works pendants ship with a 6 ft black SJT cord that can be cut to length during installation, with extra cord available by the foot at the time of order.
|
Method
|
Best for
|
Height control
|
Watch out for
|
|
Stem / downrod
|
High ceilings, heavier fixtures, formal rooms
|
Fixed at order
|
Drop must be calculated before ordering
|
|
Chain
|
Standard ceilings where height may need adjusting
|
Adjustable on site by removing links
|
Chain adds visual weight to the drop
|
|
Cord hung
|
Sloped ceilings, casual rooms, staged installs
|
Cut to length on site
|
Cord finish becomes part of the look
|
|
Flush / semi-flush
|
Ceilings under 8 ft, walkways, low entries
|
None — sits tight to the ceiling
|
Less light spread than a hung fixture
|
|
Sloped ceiling
|
Vaulted and angled ceilings
|
Depends on the mount
|
Ask what hardware the specific fixture supports
|
Table 2 — Mounting methods and what each one is good at
Canopy size deserves a glance too. The canopy is the plate covering the junction box, and if it is smaller than the existing painted ring on the ceiling you will be patching before you are finished. Check canopy diameter on the spec sheet against what is already up there.
For rooms where the ceiling is the constraint rather than the fixture, a flush mount fixture solves the problem outright, and a cord hung pendant handles the awkward middle ground where a chandelier is wanted but the drop is tight.
The Step Most Chandelier Guides Skip: Can Your Ceiling Box Carry It?
Before you buy, confirm the ceiling box is rated for the fixture's weight — this is a code requirement, not a preference. Under NEC 314.27(A)(2), a ceiling outlet box used for a luminaire must be capable of supporting a fixture weighing at least 50 lb (23 kg).
Above that weight the rule tightens. A luminaire heavier than 50 lb must be supported independently of the outlet box unless the box is listed for not less than the weight supported, and the box interior must be marked with the maximum weight it may carry.
A separate section, 314.27(C), covers boxes used for the sole support of a ceiling-suspended paddle fan, with a 70 lb limit and its own marking requirement. Fan-rated boxes are often the practical answer for a heavy fixture, but they are a different listing, so do not assume the two are interchangeable without checking the marking.
Two practical consequences. Ask for installed weight rather than shipping weight, and confirm whether it includes shades, glass and lamps. And if the fixture is going where none has hung before, such as a remodeled ceiling or a relocated dining zone, budget for blocking or a fixture-rated brace, because retrofitting support after the drywall closes is the expensive version of this conversation.
Most spun-metal chandeliers sit well under the 50 lb threshold, which is a quiet advantage of aluminum construction. Even so, have a licensed electrician confirm the existing box marking and the local code edition in force — codes are adopted state by state, and the edition matters.
Materials and Serviceability: Why a Chandelier Ages Well or Badly
A chandelier fails at its finish and its fittings long before its structure gives out, so those are the two things to interrogate. Coating quality decides how it looks in year five; parts availability decides whether year ten is a repair or a replacement.
Montclair Light Works product pages describe its metal RLM shades as spun from heavy-duty aluminum. The finish is a polyester powder coat applied after a cleansing and pretreatment process for paint adhesion, semi-gloss unless otherwise noted, with marine-grade finishing available on request. Product pages state a limited one-year warranty covering defects in materials and workmanship.
Pretreatment is the step that separates a finish that lasts from one that lifts. Coating applied straight onto bare metal looks identical on day one and starts failing at the edges and radii, where the film is thinnest and where hands and hardware make contact.
One detail changes how a room actually feels: the color inside the shade. A dark interior absorbs light and narrows the beam; a white one bounces it back down. Over a dining table that matters more than a 10-watt change in lamp choice, and fixtures built that way say so — Montclair Light Works lists a white powder-coat shade interior for maximum light output in the description of fixtures that have one.
On serviceability, ask one question before ordering: if a shade is damaged in three years, can you buy that shade in that finish. A manufacturer still spinning the part says yes. A brand reselling a discontinued import cannot, which is the practical argument for domestic made-to-order production over catalog sourcing, and the reason it is worth knowing who actually builds the fixture.
Choosing a Finish: How to Read Color in Your Own Light
Choose a chandelier finish in the room it will live in, under the light it will live under, because metal finishes shift more between light sources than almost any other material in a house. A bronze that reads warm on a screen can read flat gray against oak at 3000K.
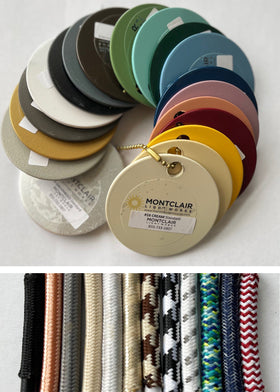
There are 23 standard powder-coat colors available, which is a very different proposition from picking from four. The range runs from quiet neutrals through saturated options, and most are semi-gloss unless a product page says otherwise.
Three practical rules keep finish decisions from going wrong. Match the chandelier to hardware you cannot easily change, such as faucets and door furniture, rather than to paint you can repaint. Test in daylight and after dark, since a north-facing dining room and the same room at 8pm are two different color conditions. And view the sample against the actual surfaces below it, not against a white wall.
Ordering a physical finish sample set before committing is the highest-return small purchase in this whole process. Screens misrepresent metallics badly, and no photograph resolves the difference between a satin and a matte version of the same color.
If the room is already built, work backward from the fixed elements. Countertop, flooring and cabinetry are the expensive constants; the fixture is the variable that adapts to them. Where a project needs a color outside the standard range, custom requests are quoted individually with upcharges and timing confirmed per project. Current direction on finish and silhouette is covered in this year's lighting trends, and the full list of available finishes is worth a slow read rather than a scroll.
Choosing by Room: Dining, Foyer, Living Space and Kitchen Island
Room function should decide configuration before style does. Dining rooms need light on a surface. Foyers need vertical presence. Living spaces need an anchor that does not dominate. Islands need an even wash along a length.
The quickest way to narrow the field is to ask what sits underneath. A defined surface, such as a table or an island, means the fixture serves that surface and gets sized to it. No defined surface, as in a foyer or a landing, means the fixture serves the volume and gets sized to the room.
Shape follows from the same question. Round surfaces take round fixtures; long rectangles take linear ones or matched pairs. Where the surface is round but the room is long, size to the table and let the room take care of itself.
Ceiling height is the third filter, and it is the one that eliminates options rather than suggesting them. Anything under 8 ft rules out a long drop over a walkway. Anything above 10 ft makes a compact fixture look stranded, no matter how well it is proportioned to the table.
|
Room
|
Configuration that usually works
|
The constraint to check first
|
|
Formal dining, round table
|
Round 3-light or multi-light, centered on the table
|
30–36 in. above the table; diameter at half to two-thirds table width
|
|
Dining, long rectangular table
|
Linear multi-light, or two matched fixtures
|
Fixture length roughly one-third to one-half the table length
|
|
Two-story foyer
|
Tall multi-light with generous drop
|
7 ft floor clearance, and centering in the window if there is one
|
|
Single-story entry
|
Compact chandelier or flush mount
|
Total drop — measure before you fall for the silhouette
|
|
Living room, 8–9 ft ceiling
|
Modest diameter, layered with wall and table lighting
|
Room length plus width in feet as the diameter ceiling
|
|
Kitchen island
|
Linear fixture, or matched pendants 24 in. apart
|
Two 16 in. shades light roughly an 80 in. run
|
|
Bedroom
|
Smaller centered fixture with dimming
|
Glare from below when lying down — check the shade interior
|
Table 3 — Configuration by room, with the constraint that most often catches people out
Low ceilings deserve their own note. Under 8 ft, a chandelier over a walkway stops being a design choice and becomes a hazard. Over a table the same ceiling works, because nobody walks there.
Open-plan spaces are the other recurring problem. The temptation is one large fixture for the whole volume; the better result is a fixture per zone, each sized to its own surface and tied together by finish rather than scale. A run of matched stem hung pendants over an island, paired with a single chandelier over the table, reads as one scheme rather than two competing ones.
Can a Chandelier Go Outdoors? Covered Porches and Damp Locations
A chandelier can be installed outdoors only if it carries the right location rating, and that rating is stated on the fixture label rather than in the product description. Location classes are dry, damp and wet, and choosing the wrong one is the fastest way to fail a fixture.
Damp-rated fixtures suit covered spots that never take direct rain: a porch ceiling, a soffit, an enclosed entry, a covered walkway. Wet-rated fixtures are sealed for direct exposure on an open wall or an eave that catches blowing rain. When the location is ambiguous, specify wet.
Montclair Light Works states that its products meet UL requirements and are labeled accordingly for Wet, Damp/Dry or Dry location use. If a fixture states no location rating at all, treat it as indoor-only regardless of how it is photographed.
Covered outdoor dining is the case worth planning properly, because it is where people most often reuse an indoor fixture and regret it. Salt air, pool chemistry and coastal humidity all attack coatings faster than rain does, which is why marine-grade finishing exists as an option and is worth asking about specifically for anything within sight of the ocean.
Wind is the other outdoor variable nobody accounts for. A long drop on an exposed porch will swing, and swinging fixtures loosen connections over time. Shorten the drop outdoors, or choose a stem mount over a chain or cord. The outdoor ceiling mount range is built for these conditions, and where headroom is tight an outdoor flush mount avoids the swing problem entirely.
A Chandelier Is One Layer: Planning the Rest of the Room
A chandelier should not be the only light in a room, and expecting it to be is the most common cause of disappointment after installation. One overhead fixture produces flat, top-down light with dark corners, no matter how good it is.
Lighting design generally works in three layers. Ambient light fills the room and is usually the chandelier's job. Task light serves a specific activity, such as reading or food preparation. Accent light picks out what you want noticed, such as art or a texture on a wall.
In a dining room that usually means the chandelier plus something at eye level or lower. Wall sconces flanking a sideboard fill the vertical gap the chandelier leaves. Picture lights over artwork add the accent layer and give the room somewhere to look after dark. A table lamp on a console does more for the feel of an entry than a brighter overhead ever will.
The practical benefit is control. With layers on separate switches you can run the chandelier at low output for dinner and lift the room with the other sources, instead of choosing between glare and gloom on a single circuit.
Plan the layers before the drywall closes if you can, because adding a sconce circuit afterward is disproportionately expensive. If the walls are already up, plug-in options and portable lighting cover most of the same ground without an electrician.
A simple test tells you whether a room is layered properly. Turn on everything, then look at the corners and the walls. If the corners are dark and the walls are dim while the floor is bright, the room has one layer doing the work of three, and the chandelier will get blamed for something that is not its fault.
Light Quality and Dimming: Color Temperature, Bulbs and Controls
Specify color temperature and dimming before you specify wattage, because those two decide how the room feels. Warmer light around 2700K suits dining and living spaces; 3000K to 3500K reads cleaner and suits kitchens and task areas.
Montclair Light Works integrated LED panels switch between 2700K and 3500K with a single flip, which removes the most common regret in fixture buying: being locked into a color temperature chosen from a photograph. For lamped fixtures, dimming works with a dimmable bulb and a compatible dimmer, and the LED retrofit bulbs use forward and reverse phase dimming compatible with 120V dimmers.
Do not skip the dimmer conversation. A dining chandelier at full output is a task light; at 40 percent it is the reason people linger at the table. Confirm compatibility against the specific lamp, since LED dimming behavior varies more by driver than by brand.
Consistency across a room matters more than the exact number you pick. Two fixtures at different color temperatures in the same sightline read as a mistake even to people who cannot name what is wrong, so set one temperature per open space and hold it across chandelier, sconces and lamps.
Bulb shape is worth a thought where the lamp is visible. An exposed lamp in an open fixture becomes part of the design, and a clear glass bulb throws a harder shadow than a frosted one. If glare from below is a concern, as it often is in bedrooms, a frosted lamp or a fixture with a deeper shade solves it more cheaply than a dimmer will.
Common Chandelier Mistakes, and How to Place the Order
Five mistakes account for most chandelier regret, and all five are avoidable at the specification stage rather than after delivery. Undersizing is first: buyers choose what feels safe in a showroom and install something that looks timid over the table.
Hanging height is second, usually because the drop was never calculated. Third is buying on silhouette and discovering the location rating or the box weight afterward. Fourth is choosing a finish from a screen. Fifth is treating the chandelier as the room's only light source.
Then order in sequence. Confirm the ceiling box rating. Download the spec sheet for dimensions, canopy size and maximum drop. Order finish samples. Ask for a written lead time, since made-to-order fixtures are built after the order lands and custom requests are quoted individually. Designers and specifiers buying at volume should set up a trade account first, and anyone who wants to see a finish in person can find a stocking retailer nearby.
Worth being straight about the trade-off: a handcrafted fixture will not arrive the day after tomorrow. In exchange you get one built to current standard in the finish you chose, with the part still available years later.
Build that window into the project schedule rather than treating it as a delay. Fixtures are usually the last thing ordered and the first thing blamed when a room is not finished, and the fix is simply to order earlier than feels necessary.
When you are ready to shortlist, this chandelier buying guide pairs best with time spent in the handcrafted chandelier range — or in the current best sellers, which is the fastest read on what is proportioned well and moving.
FAQ
How do I calculate what size chandelier I need?
Use two calculations and take the smaller result. For a fixture over a dining table, accepted design practice sets the diameter at one-half to two-thirds of the table width, so a 48-inch table suits roughly a 24 to 32-inch fixture. For a fixture centered in a room rather than over furniture, add the room length and width in feet and read the total as inches — a 12 by 14 ft room points to about 26 inches, a formula published in American Lighting Association residential guidance. Then check body height and total drop separately, because diameter alone does not tell you whether the fixture will hang at the right height. Open frame designs can usually go one size larger than dense ones.
How high should a chandelier hang above a dining table?
Hang the bottom of the fixture 30 to 36 inches above the table surface on a standard 8-foot ceiling. Add roughly 3 inches for every additional foot of ceiling height, so a 10-foot ceiling puts the fixture around 36 to 42 inches above the table. Measure to the lowest point of the fixture, not to the canopy. The range exists to protect sightlines: higher than that and the fixture lights the room instead of the table, lower and it blocks the face of whoever is sitting opposite. Where people walk underneath rather than sit, such as foyers, hallways and stairwells, the governing figure is different — keep at least 7 feet of floor clearance.
Does my ceiling box need to be rated for the chandelier's weight?
Yes, and it is a code requirement rather than a recommendation. NEC 314.27(A)(2) requires a ceiling outlet box used for a luminaire to be capable of supporting a fixture weighing at least 50 lb. A fixture heavier than 50 lb must be supported independently of the outlet box unless the box is listed for not less than the weight being supported, and the box interior must be marked with the maximum weight it can carry. Boxes used solely to support a ceiling fan fall under a separate section with a 70 lb limit and different marking. Ask the manufacturer for installed weight including shades and lamps, and have a licensed electrician confirm the existing box marking.
What is the difference between stem, chain and cord mounting?
The three differ in how much control you have over final height and how rigidly the fixture hangs. A stem or downrod mount fixes the fixture at a set height on a rigid tube, which keeps it hanging plumb and suits high ceilings, but the drop has to be calculated before ordering. A chain mount is adjustable on site by removing links, which is forgiving when a ceiling is not the height the plans claimed. A cord-hung fixture is the most adaptable and handles sloped ceilings well; Montclair Light Works pendants ship with a 6 ft cord that can be cut to length during installation, with extra cord available by the foot at time of order.
Can a chandelier be installed on a covered porch or outdoors?
Only if it carries the correct location rating, which appears on the fixture label rather than in the product description. Damp-rated fixtures are suitable for covered areas that never take direct rain, such as a porch ceiling, a soffit or an enclosed entry. Wet-rated fixtures are sealed for direct exposure on an open wall or an eave that catches blowing rain, and wet is the safer specification whenever the location is ambiguous. Montclair Light Works states its products meet UL requirements and are labeled for Wet, Damp/Dry or Dry location use. If a fixture states no rating at all, treat it as indoor-only, and shorten the drop outdoors so wind cannot swing it.
Is one large chandelier or two smaller ones better over a long table?
Two matched fixtures usually light a long table better than one oversized piece, and the crossover point is around 8 feet of table length. Two fixtures spread light evenly along the surface instead of concentrating it at the center and leaving the ends dim, and they keep each fixture at a diameter that stays proportionate to the table width. Space them so each is centered on the midpoint of its half of the table. Use identical fixtures, since mixing two different designs over one surface creates visual noise that reads as an accident. A single linear multi-light fixture is the third option and often the cleanest over a rectangular table.